Wednesday, June 29, 2011

Programmatically Scrolling a wxListBox

Something that I stumbled on recently that I could not for the life of me find an answer to. It seems so simple. You have a listbox and you want to programmatically scroll it. Why would you want to do this? Well, maybe you need to refresh the listbox, that was my case. In most cases you have to clear the list and repopulate it. Which is fine but it'll plop your user right back to y=0, which may be fine for small lists, but for large lists that can be a pain! Also you might want to persist a listbox position between sessions.

There are functions such as EnsureVisible which will scroll to a specific item, which might work for some use cases, but for mine I wanted to refresh the ListBox and in that case whatever item I chose may very well be gone once the listbox is repopulated. Aside from that, there's no handy way, that I could find, to figure out which items are currently in the view! Scrolling via item specification is a pretty half-baked way to achieve the over-all goal of automatically scrolling the listbox.

The first function I came across is the aptly named GetScrollPos, it takes an argument which specifies the orientation of the position you want. (wx.VERTICAL or wx.HORIZONTAL) It allows you to get the vertical position quite easily. Halfway there, right? Well... not quite. See, there is also a 'handy' function called SetScrollPos. Sounds like a match made in heaven, no? No. You see, SetScrollPos sets the scrollbar's position, but it does not effect the underlying window or widget. So even though your vertical scrollbar is now scrolled to position Y you'll notice that your list is still showing starting at item 0... not terribly helpful. I googled and trawled forums and scanned the api documentation and could not find a clean or obvious approach.

There is a method listbox inherits called ScrollLines. It does exactly what you'd think it does based on the name. You pass it a number (negative or positive) and it will scroll X lines up or down (based on if the number is negative or positive respectively). Sounds promising! But there is no function to get the line you're scrolled to! And my hopes were dashed again.

Then I got desperate. I thought, 'What if I take the vertical output from GetScrollPos and feed it into ScrollLines?' Immediately I answered myself, 'Probably a great big, inconsistently-scrolling mess!' But I tried it anyway. And praise be to the wx.Gods, it worked! Now, I've only tested this one in Windows 7, I cannot attest to it working on any other Windows platform, let alone Mac or *nix/BSD.

Enough yammering, let's see some code! The below is from my media player project. self.seriesList is a wx.ListBox:

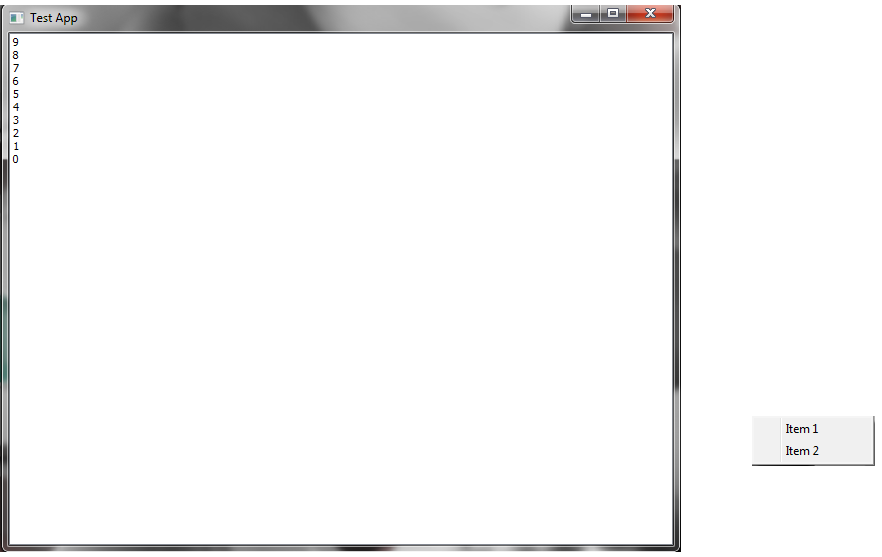
    def refreshList(self,evt=None):
        pos = self.seriesList.GetScrollPos(wx.VERTICAL)
        self.seriesList.Clear()
        for show in reversed(sorted(self.tv.getSeries(), key=lambda x: x.getName())):
            self.seriesList.Insert(show.getName()+' (%i/%i)'%(show.getWatchedEpisodeCount(),show.getEpisodeCount()),0,show)
        self.seriesList.ScrollLines(pos)

I hope this was helpful to someone! I couldn't find this anywhere.

Update 7/26/2011 -- This same method works for wx.ListCtrl as well.

wxPython AuiManager

I recently switched AnyBackup to use wx.AUI for pane management instead of just using plain old panels and sizers. First off, let me just say that SplitterWindows can go jump in a lake. They are painful to tweak, the end result isn't all that pretty, etc. Using the AuiManager, on the other hand, is very pleasant once your get your head around a few things!

A few benefits:
  • Prettier
  • Dockable, floatable, maximizable, closeable panels
  • Dead easy layout management
  • Did I mention it's pretty?
There are a few concepts you need to understand for AuiManager layout management

  • Direction (Left,Right,Center,Top,Bottom)
    • If you've ever used the BorderLayout in Java with Swing this shouldn't be too hard to understand
    • Each position represents a part of your frame, the top will add an item to the top, bottom to bottom, etc
    • The code for the below test application can be found here: http://pastebin.com/RTZjqfwp
  • Position
    • Position lets you place multiple items in a single area
    • If you're using left,center, or right position will stack items vertically
    • For top or bottom position will stack items horizontally
    • The code for the below test application can be found here: http://fpaste.org/HQ7E/
  • Row
    • Like positions, rows also let you stack multiple items in one area
    • Rows behave opposite positions, in left, center, and right items stack horizontally, etc
    • The code for the below test application can be found here: http://pastebin.com/sJLTyVsL

  • Layer
    • Notice in the above examples that when the left label is given a higher layer it takes up a global left position instead of a local left position, this is what I meant by higher layers 'trumping' lower ones

For those of you who haven't guessed yet, let me put this right out there for you, you can combine layers, positions, rows, and directions any which way you please. What does this mean? It means you can easily organize your content pretty much anyway you can think to mix and match these various control features.

Consider the below example:
We've created three sets of rows with two positions so we can stack both horizontally and vertically in one area. You can combine most any of these features. Experiment! Get a feel for how the various properties combine, it's the best way to learn. Code for the above example can be found here. I hope this example helps!


Removing And/Or Replacing a Greyhole Drive

I see this question a lot, how do you replace or remove a Greyhole pool drive? First off, yes, there is an easy and correct way to do this. Second it is not to simply remove the drive from greyhole.conf and restart Greyhole, this will not do what you want, but the correct process is easy enough.

So let's say that something terrible happens and one of your drives begins to give the click of death. It still works, but there's no saying for how long. (You should have backup's, shame on you if you don't!) Or perhaps it's something far more mundane, you're running low on space and you want to replace a smaller drive with a larger one. In either case, the below will work.

  • Add your new drive to the greyhole.conf file
    • You don't have to hook up a new drive, if your remaining volumes have enough space to absorb the file copies stored on the drive that's going away, feel free to skip this section
  • Make sure you follow all the steps to get your new drive Greyhole ready (mount it, create the gh folder, create the .greyhole_uses_this file)
  • Restart Greyhole to make sure your updated config has been picked up
Now come's the fun part! We're going to use a handy little command called --going (-n). Basically this option lets you tell Greyhole 'Hey, this drive has valid file copies, but it's going to go away soon, so don't count these file copies towards the total.' Okay, maybe that's a mouthful, how about 'Hey, Greyhole! Copy all the files on this volume to other volumes!' While overly simplified, that gives a clearer impression of what's going on.
  • Run `greyhole --going=/path/to/drive/that/is/being/removed`
    • Where /path/to/drive/that/is/being/removed matches the path for the volume that is listed in your greyhole.conf
    • Once you run this command Greyhole will automatically remove this drive from your greyhole.conf
  • Once this is run Greyhole will schedule an fsck which should proceed shortly if not immediately
  • This can take a while, if you watch the Greyhole log you should see it running through all your files and creating new file copies for any files that are on the drive which has been marked as going
  • After this is done you can unmount the drive and remove it as you wish
    • For sanity I'd unmount the drive and then verify I can still access files that were on the removed drive. If yes, then you can be fairly certain that Greyhole correctly migrated all the data
    • Once you've sanity tested, physical removal of the drive shouldn't be a problem

Tuesday, June 28, 2011

wxPython ListBox PopupMenu

I've been working on my TV Emulator project in Python for a few months now. For one of my windows I use a listbox and I wanted to create a popup menu. I've created plenty of popup menus with TreeCtrl's. It's easy enough, we've got a handy right click event which you can grab the position from. For listbox? No such luck.

If you google this issue you're likely to see many people say "Use a listctrl!" That's a perfectly valid answer, creating a popup menu is easy with a listctrl, but a listctrl is a more complex object and might be overkill for your needs. There's got to be a way to use a popup menu on a listbox, right? Right! Let's get to it.

So, we can use the wx.ContextMenuEvent to fire a function when you right click the listbox, this event can be bound to a listbox with wx.EVT_CONTEXT_MENU, below is a test application I put together to show what happens when you try to grab the position from a ContextMenuEvent. (Hint: It doesn't work! See the screenshot below.)
#! /usr/bin/python

import wx
import wx.lib.agw.aui as aui

class myFrame(wx.Frame):
    def __init__(self,parent,ID,title,position,size):
        wx.Frame.__init__(self,parent,ID,title,position,size)
        self.listbox = wx.ListBox(choices=[],id=-1,parent=self,style=wx.LB_EXTENDED)
        self.mgr = aui.AuiManager(self)
        self.mgr.AddPane(self.listbox, aui.AuiPaneInfo().Center())
        for i in xrange(10):
            self.listbox.Insert(str(i),0,None)
        self.mgr.Update()
        self.listbox.Bind(wx.EVT_CONTEXT_MENU,self.showPopupMenu)
        self.createMenu()
        self.Centre()
        
    def createMenu(self):
        self.menu = wx.Menu()
        item1 = self.menu.Append(-1,'Item 1')
        item2 = self.menu.Append(-1,'Item 2')
        
    def showPopupMenu(self,evt):
        position = evt.GetPosition()
        self.PopupMenu(self.menu,position)

class WXApp(wx.App):
    def OnInit(self):
        frame = myFrame(None,-1,'Test App',wx.DefaultPosition,wx.Size(680,550))
        frame.Show(True)
        self.SetTopWindow(frame)
        return True

def main():
    wxobj = WXApp(False)
    wxobj.MainLoop()

main()  

Notice the popup menu shows up far off the point where the mouse clicked!
So obviously this doesn't work correctly as is, right? Well, there's a way around this. We can keep the contextmenu event, or we can use the right button up event, either works. The point is we need an event that fires when the right mouse button is clicked on the listbox. The problem is that we can't depend on the event for popup menu positioning because it isn't giving a position relative to your frame. But this information is accessible from wx. See below for a modified showPopupMenu function. (All other code is the same.)
    def showPopupMenu(self,evt):
        position = self.ScreenToClient(wx.GetMousePosition())
        self.PopupMenu(self.menu,position)
This looks better! The popup menu now appears where the mouse is located at click time.
With the above modification we're now grabbing the mouse's position directly from wx and then getting a position that's relative to the frame. With this position we can now accurately show a popup menu! I hope this helps someone.

Sunday, June 19, 2011

Media Player Project Update

Back in April I made a post about creating some kind of a 'TV Emulator'. Well, I've not been idle on this. I've been busily figuring out how VLC's http interface works and all the various VLC command line arguments (there are a lot of them!). It's gotten to the point where it's a reliable little app. It weighs in at just over 1200 lines of code, you have to love Python for it's concision. The program offers the following features to date.

As a refresher the core goal of the project idea was: pick a random TV series from those available and play the first (from a chronological perspective) unwatched episode and persist this watched/unwatched information
  • Add directories to scan on refreshes
    • Directories are assumed to be have the following structure:
      • drive:\path\to\dir\<show name>\<any or no season organization -- this is optional>\*S##E##*.<valid video extension>
        • Or for your *nix people: /path/to/dir/<show name>/<any or no season organization -- this is optional>*S##E##*.<valid video extension>
      • Where S##E## is the season number and episode number -- all my ripped box sets have been ripped and named to this format precisely so I can make easy assumptions like this
      • If you're brave you could just update the threadedIndex function to use assumptions that are valid for your organization system, but obviously I cannot promise that won't break anything else (but hey, it's Python, it shouldn't be too hard, right?).
  • Look for new content on your added drives on demand
  • Track what episodes have been watched
  • Mass unwatch / watch episodes in a series
  • Blacklist series (so they won't show up on subsequent refreshes)
  • Create 'channels'
    • To start with you have an irremovable channel called 'Default' (very imaginative, I know) which contains all your shows, you can add new channels by using the bottom channel bar and hitting 'Add'
      • You can give your added channel a custom name and add your desired series to it
      • A series can belong to multiple channels
      • If you watch an episode in one channel it will be reflected as watched in all channels
  • Save your current episode and position in the episode per channel
    • If you change channels your episode / position in the first channel is saved
    • If you later go back to that first channel (assuming you didn't watch the episode you were on already) it will resume the episode from where you left off -- basically every channel persists its state
  • Skip to the next show without marking the current episode as watched, want to watch this episode just not right now? The next button is for you :)
  • Mark an episode as watched and skip to the next (the big eye button does this) if you just watched this episode the other day (say on actual television) you can just skip it and mark it as watched, no harm no foul
  • Automatically start VLC with the proper http interface enabled
    • This app requires an http interface be active since this is what it uses to communicate with VLC, so if it finds that VLC is not running, or at least no instance with http active, it will try to find VLC and then run it with --extraintf oldhttp (and it will tell vlc to never repair avi indexes -- since this can cause a bad workflow loop)
  • Automatically mark an episode as watched once you get through 90+% of it
And that's pretty much the extent of what the app does. It's filled with a few assumptions about the way I have things organized to make things simpler -- but I can do that since my girlfriend and I are the primary users. Below is a screen shot of the culmination of my efforts. It's nothing too terribly advanced but right now it does exactly what I set out to do and I'm pretty happy with it. I haven't released it anywhere yet -- I'm not even certain if anyone would be interested in it, but if anyone is I'd be happy to share.

TV Emu 0.4 for VLC
Please note, I own the Reno 911 box set s and ripped them to digital format for my own htpc use . (Read: Don't sue me.) 

Sunday, June 12, 2011

AnyBackup 0.9 Released

I've released AnyBackup 0.9 today. The GUI has been overhauled, a few key features have been added, and many pain points have been sped up significantly.


The major changes are that I've switched the GUI up to use AUI, it's a lot prettier and easier to get around in. I've tweaked remote indexing and switched to Pyro for sending remote python objects. This cut the remote indexing time in half more or less. I've also added the ability to select which directories you want to backup up from content drives.

Yes, I'm aware the screenshot below says 0.8, I forgot to update this before building the version and it's such a minor issue I saw no reason to rebuild/upload for it.


Download at: http://code.google.com/p/anybackup/downloads/list


Changes:

  • Issue 43 - Update GUI to use aui
  • Issue 44 - Search result file click broken
  • Issue 45 - Add status text to splash screen
  • Issue 46 - File view area not showing whole directory path
  • Issue 47 - Switch remote indexing to use Pyro
  • Issue 48 - Avoid using deepcopy in threaded actions
  • Issue 50 - File icon type not always correctly displayed.
  • Issue 51 - Remote index function not updating drive space information
  • Issue 25 - Allow addition of folders only
AnyBackup 0.9

Followers